No-Bake Chocolate Biscuit Salami
No-bake chocolate biscuit salami: crushed biscuits in a rich cocoa-butter mixture, rolled and chilled into a log, then sliced into salami-like rounds.

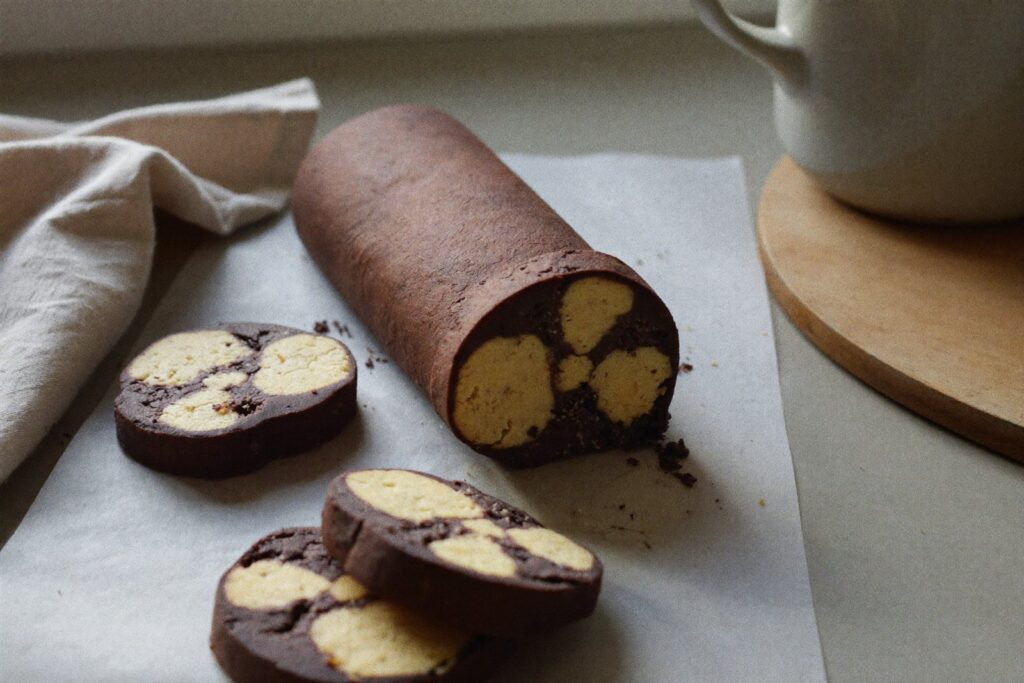
The first time I made chocolate biscuit salami, I ran the biscuits through the food processor until they were fine as sand, and what I unwrapped the next morning was a smooth brown log that could have been anything. It tasted good. It looked like nothing at all. The whole charm of this sweet lives in the pale flecks scattered through the dark, the crumbs that read, at a glance and from across a table, as the little pockets of fat in a slice of cured salami. Crush the biscuits to powder and you lose the joke. Leave them ragged, on purpose, and you get a no-bake chocolate biscuit salami that makes people lean in and ask what on earth they’re looking at.
Jump to section
- Why this no-bake trick works
- Crushing the biscuits: uneven on purpose
- Getting the mixture right: not too soft, not too dry
- Chilling and slicing cleanly
- Common mistakes, and how to avoid them
- Variations worth trying
- How to serve it
- Make-ahead and storage
- Chocolate biscuit salami FAQ
- No-Bake Chocolate Biscuit Salami
Why this no-bake trick works
There’s no oven and no clever chemistry here, just butter doing what butter does. Warm butter, cocoa, sugar, and a little milk together and you make a soft chocolate paste; fold in the crushed biscuits and it coats every crumb and glues them into one mass. Then the fridge does the actual work: butter is soft at room temperature and firm when it’s cold, so as the log chills it sets hard enough to slice. Once you see that the butter is both the flavor and the cement, the rest of the recipe makes sense, including why a log that set firm overnight slumps if it sits out on a warm afternoon.
Crushing the biscuits: uneven on purpose
This is the step that decides whether you get a salami or a plain chocolate log, so slow down for it. You want a deliberate mix of sizes: some biscuit worn down to a fine sandy rubble, and plenty of shards left the size of a pea or a small hazelnut. The fine crumbs fill the gaps and hold everything together; the big pieces are what mimic the fat in real salami once you cut a slice. Put the biscuits in a bag and go over them with a rolling pin, pressing rather than smashing, or snap them apart with your hands. Skip the food processor. It’s too fast and too thorough, and it turns the lot to uniform dust before you’ve noticed, which is exactly the mistake I made the first time.
Getting the mixture right: not too soft, not too dry
The binding paste is where most batches go wrong, in one of two directions. Melt the butter gently over low heat and take it off before it browns, then stir in the cocoa and sugar off the heat until smooth and glossy. Now add the milk a splash at a time. Milk tips the mixture from stiff to spoonable, and a little goes a long way. Pour the paste over the crushed biscuits and fold until every crumb is dark and coated.
The consistency you’re after is damp, like wet sand that clumps when you squeeze a handful and mostly holds its shape. Too dry and the log cracks and crumbles when you slice it; too wet and it never firms up, staying tacky in the middle no matter how long it chills. If it looks dry and refuses to clump, add milk half a teaspoon at a time. If you’ve overshot and it’s soupy, stir in a handful more crushed biscuit to bring it back.
Rolling it tight and compact
Tip the mixture onto a large sheet of parchment and gather it into a rough log along one edge, then roll it up inside the paper and, this is the important part, roll it tight. Press and squeeze along its length to drive out the air pockets and pack the crumbs together. A loose log looks hollow and falls apart at the knife; a tightly packed one slices into clean, solid rounds. Twist the ends of the parchment closed like a giant sweet wrapper to cinch it firm, then smooth the log with your hands until it’s an even thickness end to end.
Chilling and slicing cleanly
Into the fridge it goes, and here patience pays off. Give it at least 4 hours, and honestly overnight is better; a log that’s cold all the way through slices cleanly, while one that’s still soft in the center smears. When it’s properly firm, unwrap it and cut with a sharp knife in a single decisive stroke rather than a sawing motion, which drags the crumbs. Slices around a centimeter (just under half an inch) thick hold their shape and show off the flecks best. Serve it straight from cold, because the same butter that let it set will let it slump if it sits out too long.
Common mistakes, and how to avoid them
- Biscuits crushed to dust: the salami look disappears entirely. Leave a good number of pea-sized pieces, and crush by hand or with a rolling pin, never a processor.
- The log crumbles when sliced: the mixture was too dry. Add milk a little at a time until it clumps when pressed, and pack the log tightly as you roll.
- It never sets firm: too much milk, or not enough chilling. Keep the milk restrained, chill for at least four hours, and if it’s still soft, work in more crushed biscuit.
- Slices smear and drag: the log wasn’t cold enough, or the knife was dull. Chill it fully and cut with a sharp blade in one clean stroke.
- Grainy, flat flavor: harsh, cheap cocoa or too much sugar. Use a cocoa you’d happily smell, and taste the paste before you fold in the biscuits.
Variations worth trying
The base recipe is a starting point more than a rule. A handful of chopped walnuts or hazelnuts folded in with the biscuits adds crunch and makes the salami illusion even more convincing. A tablespoon of rum, or a teaspoon of vanilla, rounds out the chocolate; a shot of strong coffee or espresso deepens it. Grated orange zest is lovely against the cocoa. For the classic finishing touch, roll the chilled log in powdered sugar or dust it heavily just before serving, so the white coating looks like the bloom on a real salami casing. For a fudgier, sweeter result, swap the milk and sugar for a few spoonfuls of sweetened condensed milk.
How to serve it
Slice it thin and fan the rounds out on a board, and it genuinely passes for charcuterie until someone bites in. It’s at its best with something bitter alongside to balance the sweetness: strong coffee, or a small glass of milk if you’re serving children, who tend to love both the taste and the trick. A light dusting of powdered sugar over the slices finishes the salami look and softens the richness.
Make-ahead and storage
This is a make-ahead dessert by nature, since the chilling is the cooking. Wrapped in its parchment and then in foil or a bag, it keeps in the fridge for a good week to ten days, and the flavor arguably improves after a day as everything settles. It also freezes well for up to three months. Freeze it whole and tightly wrapped, then move it to the fridge to thaw before slicing, or cut it into rounds first and freeze those flat. Either way, keep it cold until just before it hits the plate.
Chocolate biscuit salami FAQ
Do I need a raw egg to hold it together?
No. Some older versions bind the mixture with a raw egg, but you don’t need one, and I’d skip it. The melted butter and milk glue the crumbs together perfectly well once chilled, so you get the same firm slice without the food-safety worry of uncooked egg.
Which biscuits work best?
Plain, dry, slightly sweet ones: tea biscuits, Marie biscuits, or digestives are all ideal. They crush into good ragged pieces and soak up the chocolate paste without going soft. Steer clear of anything cream-filled, chocolate-coated, or very buttery, which throws off both the texture and the balance of fat.
Why won’t my salami stay firm at room temperature?
Because it’s held together by butter, which softens as it warms; that’s normal, not a failure. Keep the log in the fridge until just before serving, and if you’re setting it out for a while on a warm day, put out a few slices at a time and return the rest to the cold.
No-Bake Chocolate Biscuit Salami
Ingredients
- 400 g (about 14 oz) plain biscuits (tea, Marie, or digestive)
- 150 g (about 1 1/3 sticks) butter
- 100 g (about 1/2 cup) sugar
- 4 tbsp (about 25 g) unsweetened cocoa powder
- 60 ml (about 1/4 cup) milk
- 1 tsp vanilla extract, or 1 tbsp rum (optional)
- 80 g (about 1/2 cup) chopped walnuts or hazelnuts (optional)
Instructions
- Break the biscuits into a mix of sizes, some crushed to fine crumbs and plenty left in pea- to hazelnut-sized pieces. Crush them by hand or with a rolling pin in a bag, not a food processor, so the larger shards survive.
- Melt the butter gently over low heat and take it off before it browns. Off the heat, stir in the cocoa and sugar until smooth and glossy, then add the milk a splash at a time, along with the vanilla or rum if using.
- Pour the warm chocolate paste over the crushed biscuits (and the nuts, if using) and fold until every crumb is coated and the mixture clumps when you press a handful together.
- Tip the mixture onto a large sheet of parchment and gather it into a log along one edge.
- Roll it up tightly in the parchment, pressing and compacting as you go to drive out air pockets, then twist the ends closed like a sweet wrapper and smooth it to an even thickness.
- Chill in the fridge for at least 4 hours, ideally overnight, until firm all the way through.
- Unwrap and slice into rounds about a centimeter thick with a sharp knife, wiping the blade between cuts. Serve cold.